
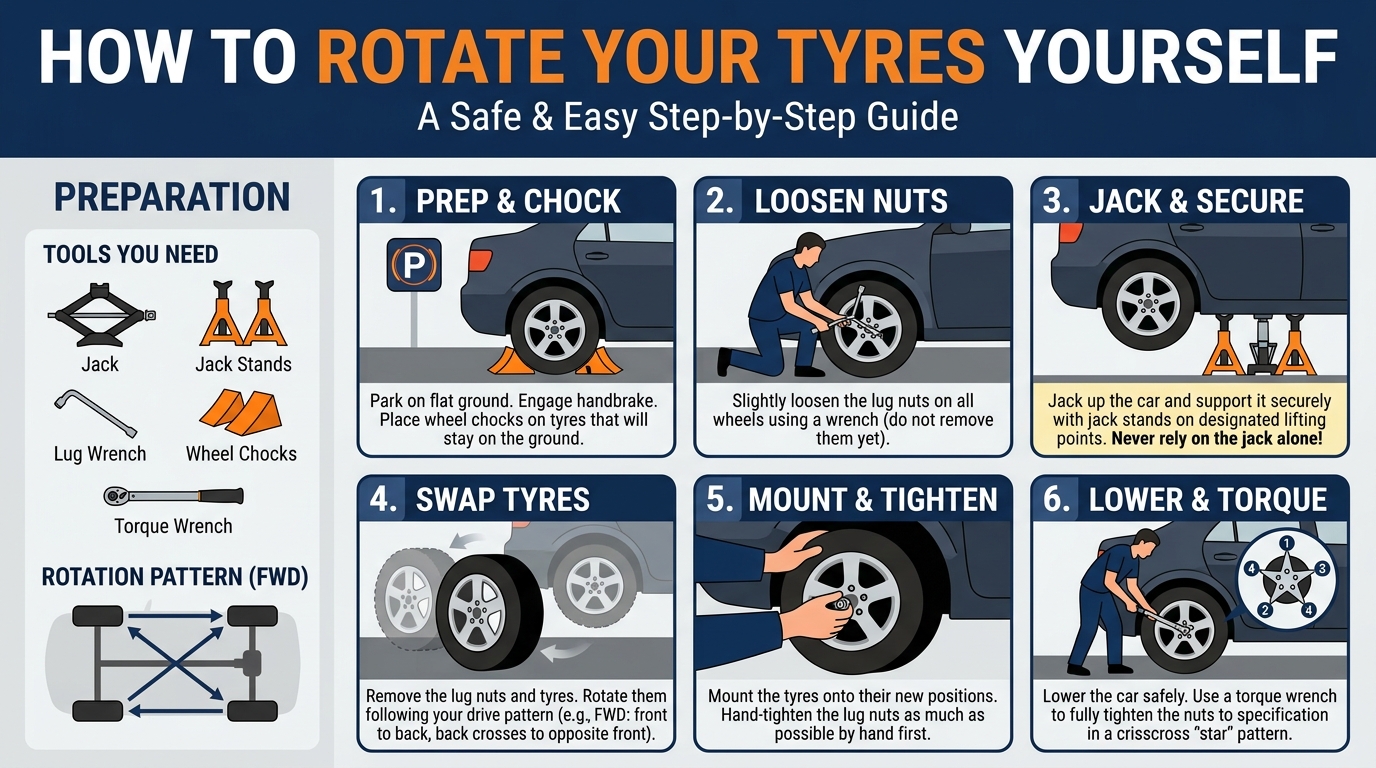
Learn the secret to prolonging the life of your tires and improving the performance of your vehicle by mastering the art of rotating your own tires. In this guide, we will walk you through the step-by-step process of rotating your tires yourself, saving you time and money while ensuring your safety on the road. Whether you’re a beginner or a seasoned car enthusiast, this DIY task is essential for maintaining optimal tire wear and maximizing your driving experience.
Tools and materials needed
Tools: For this task, you will need a few specific tools to help you safely and efficiently rotate your car’s tires. Make sure to have a lug wrench or tire iron to remove and tighten the lug nuts, a car jack to lift the vehicle off the ground, and jack stands to support the car once it’s elevated.
Materials: In addition to the tools, you’ll also need some materials to complete the tire rotation process. It’s essential to have a set of wheel chocks to prevent the car from rolling while you work on it. You may also want to have a torque wrench to ensure that the lug nuts are properly tightened to the manufacturer’s specifications.
3. Jacking up the car
Jacking up the car is a crucial step in the tire rotation process as it allows you to safely and efficiently remove the tires. To jack up the car, first, ensure the vehicle is parked on a flat surface and the parking brake is engaged. Locate the jack points specified in your car’s manual to avoid damaging the vehicle’s frame. Place the jack under the designated jack point and slowly raise the car until the tire is off the ground.
Remember to use jack stands to support the vehicle once it is lifted to ensure stability and safety. Never rely solely on the jack to hold the car up. Double-check that the car is securely positioned on the jack stands before proceeding to remove the tires. By following proper jacking procedures, you can ensure a safe working environment while performing tire maintenance on your vehicle.

4. Removing the Tyres
Removing the tyres is a crucial step in the tyre rotation process. Before starting, ensure the car is securely supported on jack stands and the parking brake is engaged. Use a lug wrench to loosen the lug nuts on the tyre, but do not remove them completely at this stage. It is recommended to follow a star pattern when loosening the lug nuts to prevent warping the brake rotor.
Once the lug nuts are loose, carefully lift the tyre off the wheel hub and set it aside. Be cautious of the weight of the tyre to avoid any injuries. Inspect the tyre for any signs of wear, such as uneven tread wear or damage, which may indicate issues with alignment or suspension components. Repeat the process for each tyre that needs to be rotated, following the same safety precautions.
5. Rotating the tyres
Rotating the tyres is a crucial maintenance task that helps ensure even wear and extends the lifespan of your tires. The purpose of rotating the tires is to distribute the wear more evenly across all four tires, as each position on the car can cause different types of wear. Front tires tend to wear more on the edges, while rear tires wear more evenly. By rotating the tires, you can help maximize their lifespan and improve overall vehicle performance.
There are different rotation patterns depending on whether your vehicle is front-wheel drive, rear-wheel drive, or all-wheel drive. For example, for front-wheel drive vehicles, a common rotation pattern is moving the front tires straight back to the rear and crossing the rear tires to the front. It’s important to consult your vehicle’s manual or a professional mechanic to determine the appropriate rotation pattern for your specific vehicle to ensure optimal tire wear and performance.
6. Installing the tyres
Installing the tyres is the final step in the tyre rotation process. Start by lifting the tyre onto the wheel hub carefully, making sure the holes in the wheel line up with the studs on the hub. Once the tyre is in place, hand tighten the lug nuts in a crisscross pattern to ensure even tightening.
After hand tightening, lower the car back to the ground and use a torque wrench to tighten the lug nuts to the manufacturer’s specifications. Be sure to tighten the lug nuts in the same crisscross pattern to prevent warping the brake rotors. Finally, double-check that all lug nuts are tightened securely before driving the vehicle.
Lowering the Car
Lowering the car is the final step in the tire rotation process. Once you have securely installed the tires onto the correct wheel hubs and tightened the lug nuts, it is time to lower the car back to the ground. This step is crucial to ensure the vehicle is stable and safe to drive.
Use the jack to carefully lower the car by turning the handle counterclockwise. Slowly lower the car until all four wheels are in contact with the ground. Once the car is fully lowered, remove the jack from underneath the vehicle and place it back in its storage location. Remember to double-check that all lug nuts are properly tightened before driving the car.