
“Have you ever found yourself in a situation where your car suddenly starts making a strange noise, and you suspect it could be related to the serpentine belt? Don’t worry, replacing a serpentine belt is a manageable task that can save you time and money if done correctly. In this guide, we will walk you through the steps to replace a serpentine belt, empowering you to tackle this common car maintenance task with confidence and ease.”
Tools and Materials Needed
Replacing a serpentine belt requires a few essential tools and materials to ensure a smooth and successful process. Here is a list of items you will need:
- Socket set: To loosen and tighten bolts.
- Serpentine belt tool: For releasing tension from the belt.
- New serpentine belt: Make sure to purchase the correct size for your specific vehicle model.
- Gloves and safety goggles: To protect your hands and eyes during the replacement.
- Rag or towel: For cleaning any dirt or debris in the area.
- Vehicle manual: To refer to specific instructions for your car.
Having these tools and materials ready before starting the replacement process will help you work efficiently and effectively. Make sure to double-check that you have everything you need before getting started.
3. Locate the Tensioner Pulley
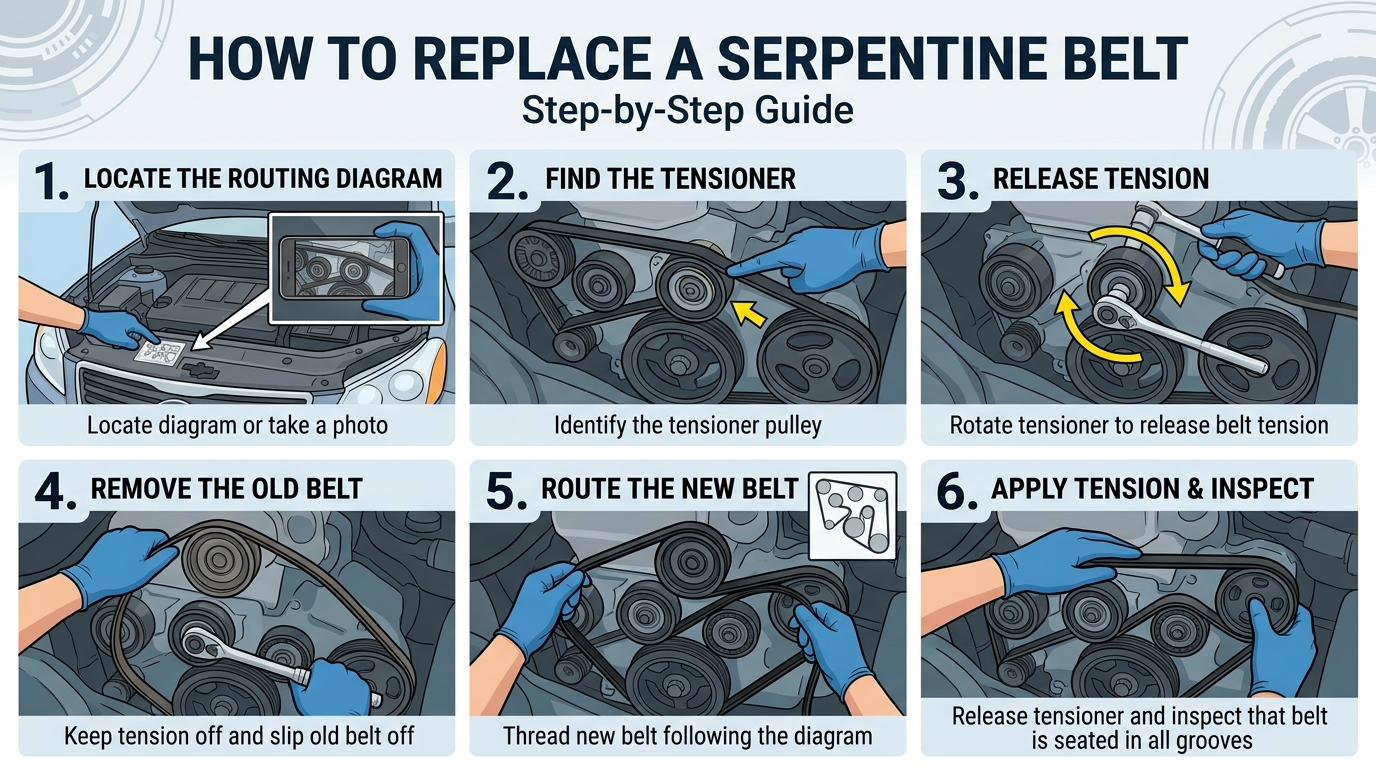
Before replacing a serpentine belt, it is crucial to locate the tensioner pulley. The tensioner pulley is responsible for maintaining the appropriate tension in the belt, ensuring it stays in place and functions efficiently. Typically, the tensioner pulley can be found near the front of the engine and is connected to an adjustable arm or spring mechanism.
To locate the tensioner pulley, refer to the vehicle’s manual for specific instructions or diagrams. In most cases, the tensioner pulley can be identified by its smooth surface and lack of grooves like other pulleys in the engine. Once you have located the tensioner pulley, make note of its position and the tools needed to release the tension for belt replacement.

4. Remove the Old Serpentine Belt
Removing the old serpentine belt is a crucial step in the process of replacing it with a new one. Start by locating the tensioner pulley and using the appropriate tool to relieve tension on the belt. This may involve using a wrench or a specialized belt tensioner tool, depending on the make and model of your vehicle. Once the tension is released, carefully slide the old belt off of the pulleys, making note of the routing pattern to ensure the new belt is installed correctly.
Inspect the old serpentine belt for any signs of wear, damage, or cracking. It’s important to replace the belt if you notice any issues to prevent potential breakdowns or damage to other components in the engine. Once the old belt is removed, you are ready to proceed with installing the new serpentine belt following the manufacturer’s recommended routing diagram.
5. Install the New Serpentine Belt
Installing a new serpentine belt is a crucial step in maintaining your vehicle’s engine performance. Begin by referring to the belt routing diagram located near the radiator or underside of the hood. This diagram illustrates the correct path for the belt to follow around each pulley. Make sure to align the new belt according to the diagram to prevent any issues with belt slippage or improper tension.
Next, carefully thread the new serpentine belt around each pulley, ensuring it fits snugly within the grooves. Use a socket wrench or belt tensioner tool to relieve tension and slide the belt over the final pulley. Double-check the belt alignment and tension before starting the engine to avoid any potential damage. Once the new serpentine belt is correctly installed, you can proceed to the final step of checking the belt tension to guarantee optimal performance and longevity.
6. Check Belt Tension
Checking belt tension is a crucial step to ensure the proper functioning and longevity of your serpentine belt system. A belt that is too loose can slip, causing the accessories to not work efficiently, while a belt that is too tight can put excessive strain on the components, leading to premature wear and potential damage.
To check the tension of the serpentine belt, you can use a belt tension gauge or simply press down on the belt at its longest stretch between pulleys. The belt should deflect a certain amount, usually about half an inch to an inch, depending on the specifications provided by the manufacturer. If the belt deflection is too much or too little, you may need to adjust the tension by loosening or tightening the tensioner pulley until the proper tension is achieved. Once the correct tension is set, double-check all connections and pulleys before starting the engine to ensure everything is secure and properly aligned.
Conclusion
After following the steps outlined in this guide, you should now have successfully replaced your serpentine belt. It is crucial to ensure that the new belt is installed correctly and that the tension is adjusted properly to prevent any issues while driving. Regularly checking the condition of your serpentine belt and replacing it when necessary can help maintain the health and performance of your vehicle.
Remember to consult your vehicle’s manual for specific instructions and diagrams related to your make and model. If you encounter any difficulties during the process, it is recommended to seek professional help to avoid causing further damage to your vehicle. By taking care of your serpentine belt and performing regular maintenance, you can help prolong the lifespan of your vehicle’s engine and ensure smooth operation on the road.