
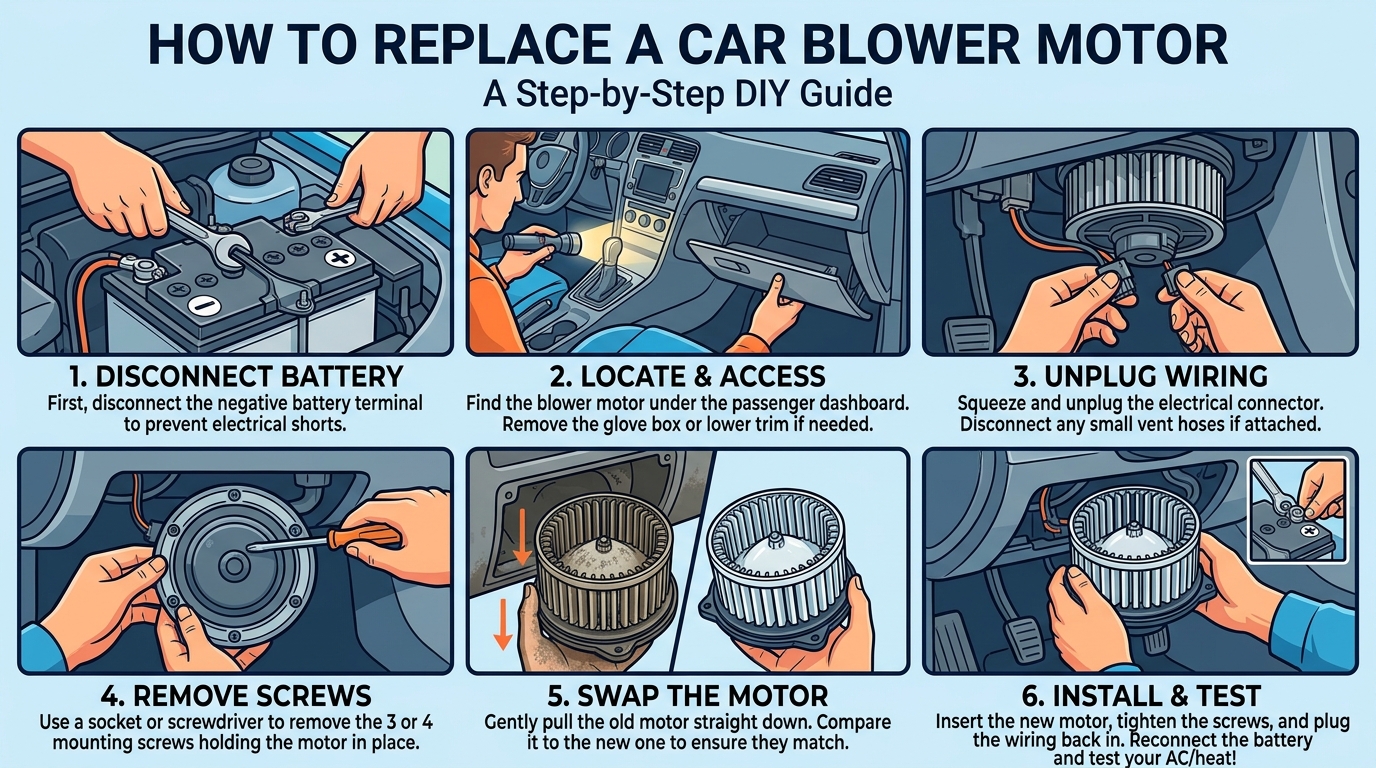
If you’ve ever found yourself facing a malfunctioning blower motor in your vehicle or HVAC system, you know just how crucial this component is for maintaining comfort and proper airflow. Learning how to replace a blower motor can save you time and money, and empower you to tackle this common issue on your own. In this guide, we’ll walk you through the steps to successfully replace a blower motor, giving you the confidence to take on this repair with ease.
Tools and Materials Needed
Tools: To replace a blower motor in a vehicle, you will need a set of basic tools such as screwdrivers, socket wrench set, pliers, and possibly a multimeter for testing electrical connections. Additionally, having a service manual specific to your vehicle make and model can be extremely helpful in guiding you through the process.
Materials: The materials required for this task include the new blower motor, replacement screws or bolts if necessary, and electrical connectors if they are not already attached to the new motor. It’s also a good idea to have some cleaning wipes or a rag handy to clean any dirt or debris that may have accumulated in the blower motor housing.
Safety Precautions
When working on replacing a blower motor in a HVAC system, it is crucial to prioritize safety to prevent any accidents or injuries. Firstly, ensure that the power to the HVAC system is completely turned off before starting any work. This can be done by switching off the circuit breaker or disconnecting the power supply. It is also recommended to use personal protective equipment such as gloves and safety glasses to protect yourself from any sharp edges or debris.
Additionally, make sure to work in a well-ventilated area to avoid inhaling any dust or fumes that may be released during the replacement process. Always follow the manufacturer’s instructions and guidelines for the specific HVAC unit being worked on. Lastly, if you are unsure about any step of the process or feel uncomfortable with the task, it is best to seek help from a professional HVAC technician to ensure the job is done safely and correctly.
4. Removing the Old Blower Motor
Before beginning the process of removing the old blower motor, it is essential to ensure that the power to the HVAC system has been completely turned off. This can typically be done by switching off the circuit breaker that controls the unit. Additionally, it is advisable to wear appropriate safety gear such as gloves and safety glasses to protect yourself from any potential hazards.
To remove the old blower motor, start by locating the access panel on the HVAC unit. Once the panel is open, you should be able to see the blower motor inside. Carefully disconnect the electrical wires connected to the motor, ensuring that you note down or label each wire to facilitate easy reconnection later. Next, remove any mounting screws or bolts that secure the motor in place. With the screws removed, gently pull out the old blower motor, being cautious not to damage any surrounding components in the process. Once the old motor is removed, you are now ready to proceed with installing the new blower motor.
5. Installing the New Blower Motor
Step 1: Positioning the New Motor – Begin by carefully placing the new blower motor into the designated slot in the HVAC system. Ensure that it is aligned correctly with the mounting brackets to avoid any issues during installation.
Step 2: Securing the Motor – Once the new blower motor is in place, secure it by tightening the mounting screws or bolts. Make sure that the motor is firmly held in position to prevent any vibrations or movement that could lead to operational problems.
Step 3: Reconnecting Wires – Next, reconnect the electrical wires to the corresponding terminals on the new blower motor. Double-check that each wire is securely attached to prevent any loose connections that could result in electrical malfunctions.
Step 4: Reattaching Panels – Finally, reattach any panels or covers that were removed during the old blower motor removal process. Ensure that all components are properly secured and that the HVAC system is reassembled according to the manufacturer’s instructions.
6. Testing the Blower Motor
Testing the blower motor is a crucial step in the process of replacing or repairing it. Before reassembling everything, you want to ensure that the new blower motor is functioning properly. To do this, you can connect the blower motor to power directly to see if it operates smoothly. This can be done by using jumper wires to connect the motor directly to the battery.
Once you have connected the blower motor to power, observe its performance. Listen for any unusual noises that could indicate a problem with the motor. Also, check if the motor is blowing air at the expected speed and intensity. If everything seems to be working correctly, you can proceed with reassembling the components and completing the installation process. If any issues arise during testing, further troubleshooting may be required to identify and rectify the problem before proceeding.
Conclusion
After following the steps outlined in this guide, you should now have successfully replaced the blower motor in your HVAC system. Ensuring that your heating and cooling system is functioning properly is essential for maintaining a comfortable indoor environment. By replacing a faulty blower motor, you have taken a proactive step in ensuring the efficiency and longevity of your HVAC system.
Remember to always refer to the manufacturer’s instructions and safety guidelines when working on your HVAC system. Regular maintenance and prompt repairs can help prevent costly breakdowns and ensure that your system operates at its best. If you encountered any difficulties during the replacement process, it may be best to consult a professional HVAC technician to ensure that the job is done correctly.