
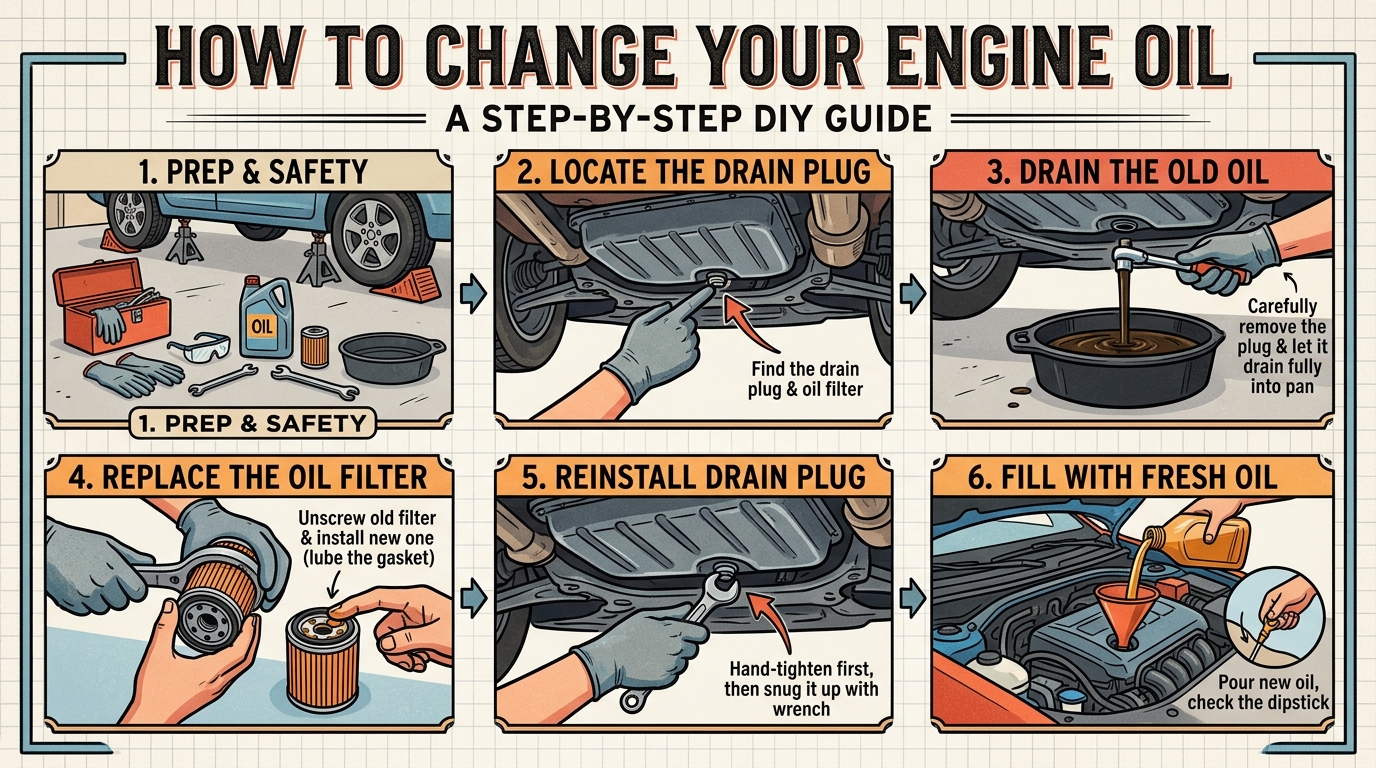
Changing your engine oil is a crucial maintenance task that can help prolong the life of your vehicle and ensure optimal performance. In this step-by-step guide, we will walk you through the process of changing your engine oil, empowering you to take control of your car’s maintenance and save money on costly service appointments. Whether you’re a seasoned DIY enthusiast or a novice looking to learn a new skill, this guide is designed to make the process simple and straightforward. Let’s dive in and discover how easy it can be to change your engine oil like a pro.
Tools and Materials Needed
Oil Filter Wrench: This tool is essential for removing the old oil filter. Make sure it fits your specific filter size to avoid damaging the filter during removal.
Oil Drain Pan: You will need a drain pan to collect the old oil safely. Ensure it has enough capacity to hold all the oil from your vehicle.
Funnel: A funnel is necessary for pouring new oil into the engine without spillage. Choose a funnel that is clean and free from debris to prevent contamination of the fresh oil.
New Oil and Oil Filter: Be sure to have the correct type and amount of oil recommended for your vehicle. Also, have a new oil filter on hand to replace the old one during the oil change process.
Preparation
Preparing for an oil change is essential to ensure a smooth and efficient process. Begin by gathering all the necessary tools and materials, such as a socket wrench, oil filter wrench, oil pan, funnel, new oil filter, and the appropriate amount and type of new oil for your vehicle. It is also advisable to have some gloves and rags on hand to keep your hands clean and to wipe up any spills.
Next, park your vehicle on a level surface and allow the engine to cool down for a few minutes before starting the oil change. This helps the oil to settle, making it easier to drain. It is recommended to wear eye protection and work in a well-ventilated area to prevent any accidents or exposure to fumes. Additionally, consult your vehicle’s manual to locate the oil drain plug and oil filter to familiarize yourself with their positions before proceeding with the oil change.

4. Draining the Old Oil
Draining the old oil from your vehicle is a crucial step in performing an oil change. To begin, make sure your engine is cool to avoid any burns. Position a drain pan underneath the oil drain plug located at the bottom of the oil pan. Use a wrench to loosen the plug counter-clockwise and remove it carefully to let the old oil flow out.
Allow the old oil to drain completely before replacing the drain plug securely. Inspect the drain plug and gasket for any damage or wear, and replace them if necessary. Properly disposing of the old oil is essential for the environment, so be sure to collect it in a sealable container and take it to a recycling center or an auto parts store for recycling.
5. Replacing the Oil Filter
Replacing the oil filter is an essential part of an oil change to ensure optimal engine performance and longevity. The oil filter is responsible for trapping contaminants and debris that can accumulate in the engine oil over time, preventing them from circulating and causing damage to engine components. To replace the oil filter, start by locating the filter under the vehicle. It is typically found near the oil pan or engine block.
Before removing the old oil filter, make sure to place a drain pan underneath to catch any oil that may spill out. Using an oil filter wrench or a specialized removal tool, carefully loosen and remove the old filter in a counterclockwise direction. Take care not to spill oil on yourself or the surrounding area. Once the old filter is off, inspect the filter housing for any debris or leaks, then lubricate the rubber gasket on the new filter with a bit of fresh oil before installing it. Tighten the new filter by hand, ensuring it is snug but not over-tightened to prevent leaks.
6. Adding New Oil
Adding new oil is the final step in an oil change process for a vehicle. After draining the old oil and replacing the oil filter, it is crucial to add the correct amount and type of oil to ensure the engine runs smoothly. To add new oil, locate the oil filler cap under the hood of the car. Remove the cap and use a funnel to pour the recommended amount of oil into the engine. Refer to the owner’s manual for the correct oil viscosity and quantity for your specific vehicle.
Once the new oil has been added, replace the oil filler cap securely. Start the engine and let it run for a few minutes to allow the oil to circulate throughout the engine. Turn off the engine and check for any leaks around the oil filter and drain plug. Finally, check the oil level using the dipstick to ensure it falls within the recommended range. Top up if necessary and you have successfully completed the oil change process.
Checking the Oil Level
Checking the oil level is a crucial step in maintaining your vehicle’s engine health. To begin, park your car on a level surface and wait a few minutes for the oil to settle in the oil pan. Locate the oil dipstick, usually a brightly colored handle labeled “Engine Oil,” and pull it out. Wipe it clean with a cloth or paper towel, reinsert it all the way in, and then pull it out again to get an accurate reading.
Inspect the oil level on the dipstick and ensure it falls within the designated range marked on the dipstick or in the owner’s manual. If the oil level is below the minimum mark, add more oil carefully. If the oil level is above the maximum mark, it’s advisable to drain some oil to prevent overfilling. Regularly checking the oil level can help you detect leaks, consumption issues, or engine problems early on, ultimately prolonging the life of your vehicle.