
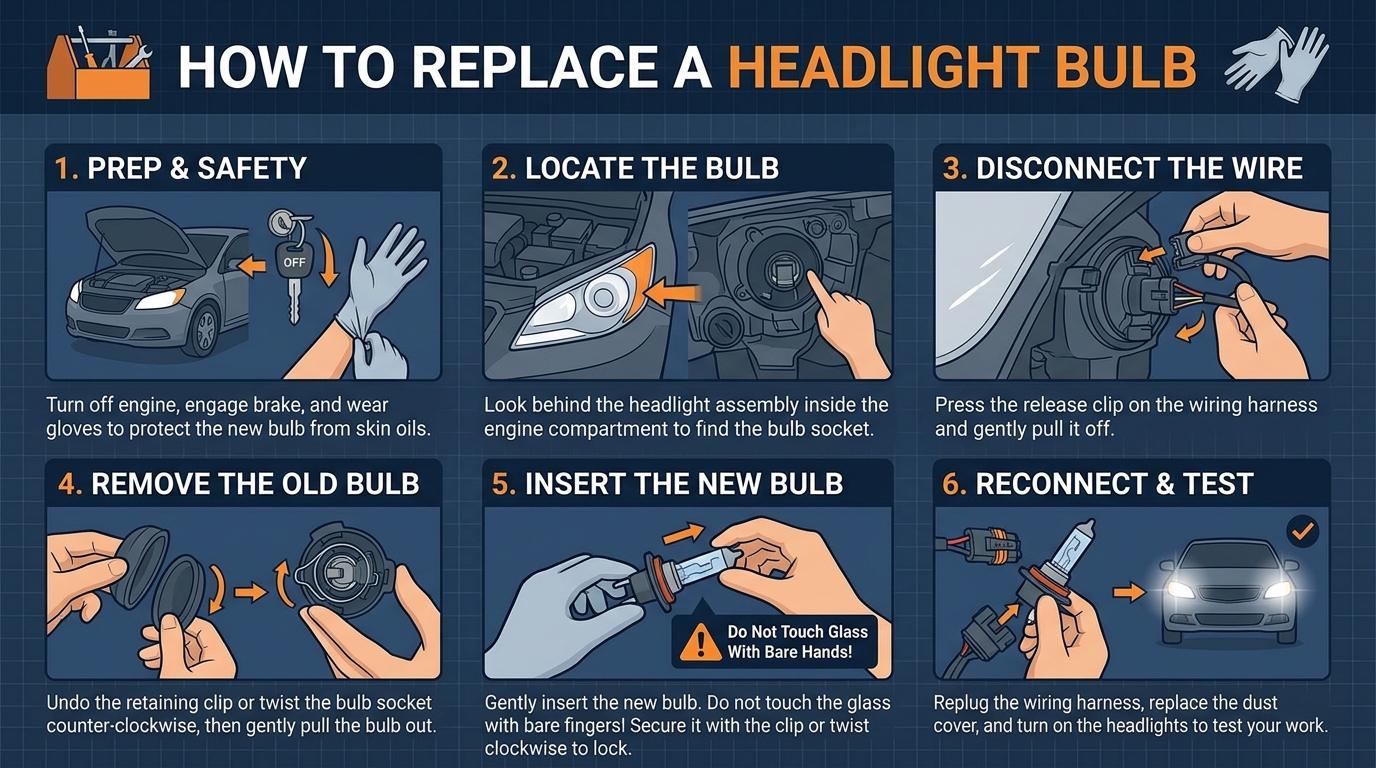
Learn how to easily replace a headlight bulb and regain clear visibility on the road in no time. This simple DIY task can save you time and money, as well as ensure your safety while driving. Follow our step-by-step guide to discover the straightforward process of replacing a headlight bulb and get back on the road with confidence.
Tools Needed
Replacing a headlight bulb may seem like a daunting task, but with the right tools, it can be a straightforward process. Before you begin, make sure you have the necessary tools handy. The most common tools required for this task include gloves to protect your hands from dirt and oil, a flathead screwdriver to remove any clips or covers, and a new headlight bulb that is compatible with your vehicle’s make and model.
3. Locate and Access the Headlight Bulb
Locating and accessing the headlight bulb in your vehicle is the first step to replacing it. Typically, you will need to open the hood of your car and locate the back of the headlight assembly. This may require removing a plastic cover or accessing it from behind the headlight housing, depending on the make and model of your vehicle. Refer to your car’s manual for specific instructions on how to access the headlight bulb.
Once you have located the headlight bulb, you may need to twist a cap, turn a locking ring, or unplug a wiring harness to access the bulb itself. Be sure to handle the bulb carefully to avoid damaging it or getting oils from your skin on the glass, as this can lead to premature bulb failure. Take note of how the old bulb is positioned before removing it, as you will need to insert the new bulb in the same orientation.
Remove the Old Bulb
Before removing the old headlight bulb, make sure the headlight switch is off to prevent any accidents. Start by locating the back of the headlight assembly, usually accessible from under the hood. You may need to remove a dust cover or twist a cap to access the bulb. Once you have clear access to the bulb, identify the wiring harness connected to it.
To remove the old bulb, you will typically need to twist it counterclockwise or push it in slightly and then twist to unlock it from the socket. Be gentle but firm to avoid damaging the bulb or the socket. Once the bulb is free from the socket, carefully disconnect the wiring harness. Dispose of the old bulb properly, following any local regulations for handling hazardous materials.
5. Insert the New Bulb
Inserting the new headlight bulb is a straightforward process that requires careful handling to avoid damaging the bulb. Begin by holding the new bulb by its base, making sure not to touch the glass part with your fingers as the oils from your skin can cause the bulb to fail prematurely. Align the tabs on the base of the bulb with the slots in the headlight assembly, then gently push the bulb into place until it is securely seated.
Once the new bulb is in position, reconnect the electrical connector by pressing it onto the prongs of the bulb until it clicks into place. Make sure the connector is firmly attached to ensure proper functioning of the headlight. Finally, reattach any covers or panels that were removed earlier to access the bulb, making sure they are securely fastened to protect the bulb from dust and moisture.
6. Test the Headlight
Testing the headlight after replacing the bulb is crucial to ensure that the new bulb is functioning properly. To test the headlight, simply turn on the vehicle’s headlights and observe the brightness of the newly installed bulb. The headlight should illuminate brightly without any flickering or dimming.
If the headlight does not turn on or if it appears dim or flickering, it may indicate an issue with the bulb installation or a larger electrical problem. In such cases, it is recommended to double-check the bulb installation to ensure it is securely in place. If the issue persists, it may be necessary to seek professional assistance to diagnose and fix the problem.
Conclusion
After following the steps outlined above, you should now have successfully replaced the headlight bulb in your vehicle. Remember that proper maintenance of your headlights is crucial for your safety and the safety of others on the road. Regularly checking and replacing bulbs when necessary can help ensure optimal visibility while driving, especially during nighttime or adverse weather conditions.
Additionally, by learning how to replace a headlight bulb yourself, you have saved time and money that would have otherwise been spent at a mechanic’s shop. This simple DIY task can be completed in just a few minutes with the right tools and instructions. Make sure to properly dispose of the old bulb and keep a spare bulb handy for future replacements. Congratulations on successfully completing this maintenance task!