
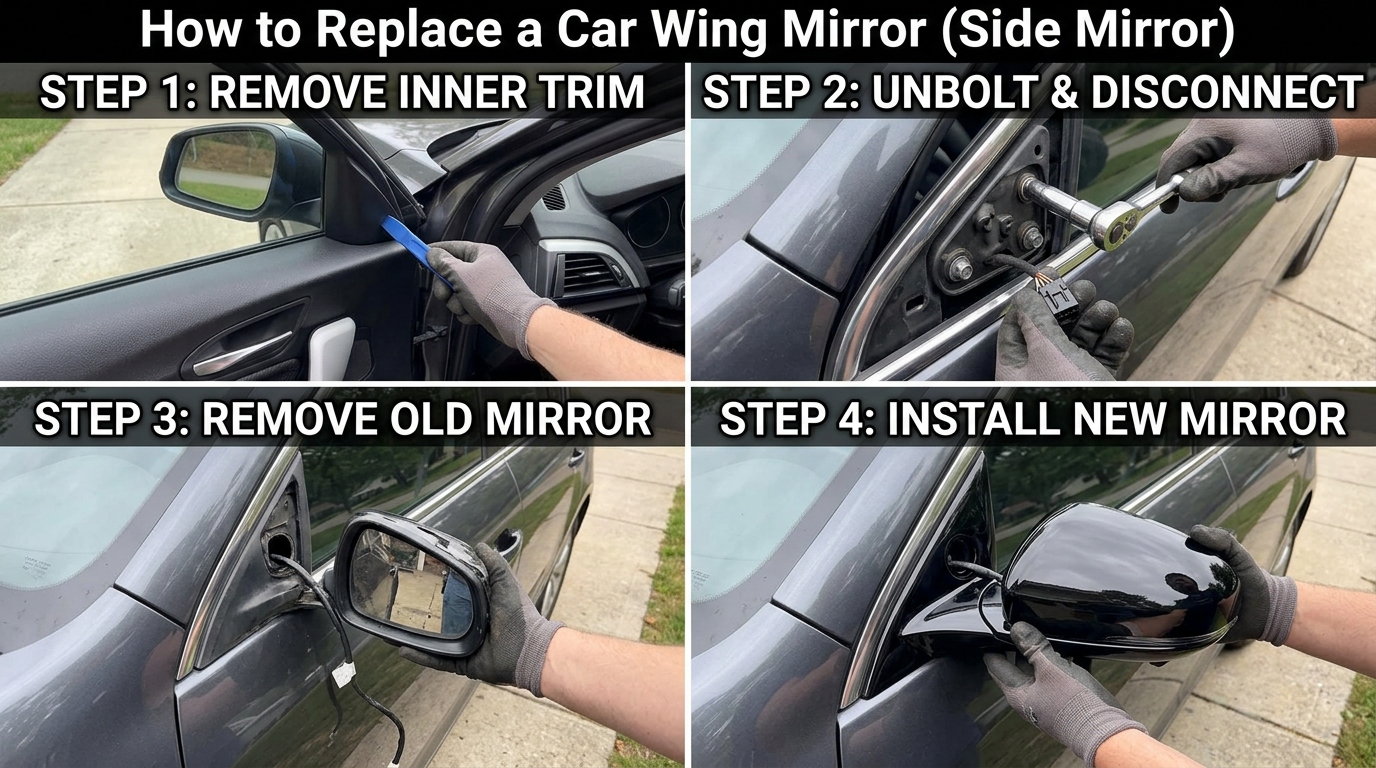
Learn the simple steps to replace a wing mirror and gain the confidence to tackle this task yourself. Say goodbye to costly repair bills and hello to a newfound sense of accomplishment. Whether you’re a seasoned DIY enthusiast or a novice looking to learn a new skill, this guide will walk you through the process with ease. Let’s get started!
Tools and materials needed
Replacing a wing mirror requires a few essential tools and materials to ensure a successful installation. Firstly, you will need a flathead screwdriver to remove any screws or fasteners holding the old wing mirror in place. Additionally, a socket wrench set may be necessary to detach the mirror from the door panel.
For the installation of the new wing mirror, you will need the replacement mirror assembly itself, ensuring it is compatible with your vehicle model. It is also recommended to have a cleaning cloth and glass cleaner handy to ensure a clean and clear mirror surface. Lastly, having a friend or assistant to help hold the mirror in place during installation can be beneficial.
3. Removing the old wing mirror
Step 1: Start by carefully removing the plastic cover behind the mirror. Use a flathead screwdriver or a trim removal tool to pry it off gently. Be cautious not to break the clips holding the cover in place.
Step 2: Once the cover is off, you will see the bolts securing the mirror to the door. Use the appropriate size socket wrench to loosen and remove these bolts. Keep track of the bolts and any washers that may be present.
Step 3: After removing the bolts, disconnect any wiring harness connected to the mirror. This may involve pressing a tab or squeezing a connector to release it. Be gentle to avoid damaging the wires.
Step 4: With the bolts and wiring disconnected, you can now carefully pull the old wing mirror away from the door. It may still be attached by adhesive, so apply gentle pressure and wiggle it if necessary until it comes loose completely.
4. Installing the new wing mirror
Installing the new wing mirror is a straightforward process that requires careful attention to detail. Begin by positioning the new mirror in place, ensuring that it aligns correctly with the mounting points on the door. Once aligned, secure the mirror in place using the appropriate screws or bolts provided with the replacement part.
It is essential to tighten the screws or bolts evenly to prevent any misalignment or damage to the mirror housing. Double-check that the mirror is securely attached before proceeding to the next steps. Finally, connect any electrical components, such as heating or power mirrors, according to the manufacturer’s instructions. Once the new wing mirror is properly installed and secured, you can proceed to adjust and test its functionality.
5. Adjusting the Wing Mirror
Adjusting the wing mirror is a crucial step to ensure proper visibility while driving. Start by sitting in the driver’s seat and adjusting the mirror using the controls inside the vehicle. Use the up, down, left, and right controls to position the mirror to your desired angle. Make sure you can see the rear of your vehicle and a small portion of the road behind you.
Once you have adjusted the mirror from inside the car, step outside to fine-tune the angle. Stand beside the vehicle and visually check the mirror’s alignment with the rear of the car. Make any necessary adjustments to eliminate blind spots and improve visibility. Remember that proper mirror adjustment is essential for safe driving and should be customized to your height and seating position.
6. Testing the new wing mirror
Testing the new wing mirror is a crucial step to ensure it is functioning correctly and providing optimal visibility. Start by adjusting the mirror to your preferred position, both vertically and horizontally, to ensure you have a clear view of the surrounding area. Once the mirror is positioned correctly, sit in the driver’s seat and visually inspect the reflection to confirm that there are no blind spots or distortions.
Next, test the mirror by adjusting it to different angles and checking for any vibrations or loose fittings that could affect its stability while driving. Additionally, consider testing the mirror by having someone walk around the car while you observe the reflection to ensure that it provides an accurate representation of objects around your vehicle. By thoroughly testing the new wing mirror, you can guarantee enhanced safety and visibility while on the road.
Conclusion
The installation of a new wing mirror can be a straightforward process that enhances the functionality and appearance of your vehicle. By following the steps outlined in this guide, you can successfully remove the old wing mirror, install the new one, adjust it to your liking, and ensure it is working correctly through testing.
Remember to exercise caution and patience during each step to avoid damaging any components of the wing mirror or your vehicle. Regularly checking and adjusting your wing mirrors is essential for safe driving, as they play a crucial role in providing visibility and awareness of your surroundings. With the new wing mirror properly installed and adjusted, you can enjoy improved safety and convenience on the road.