
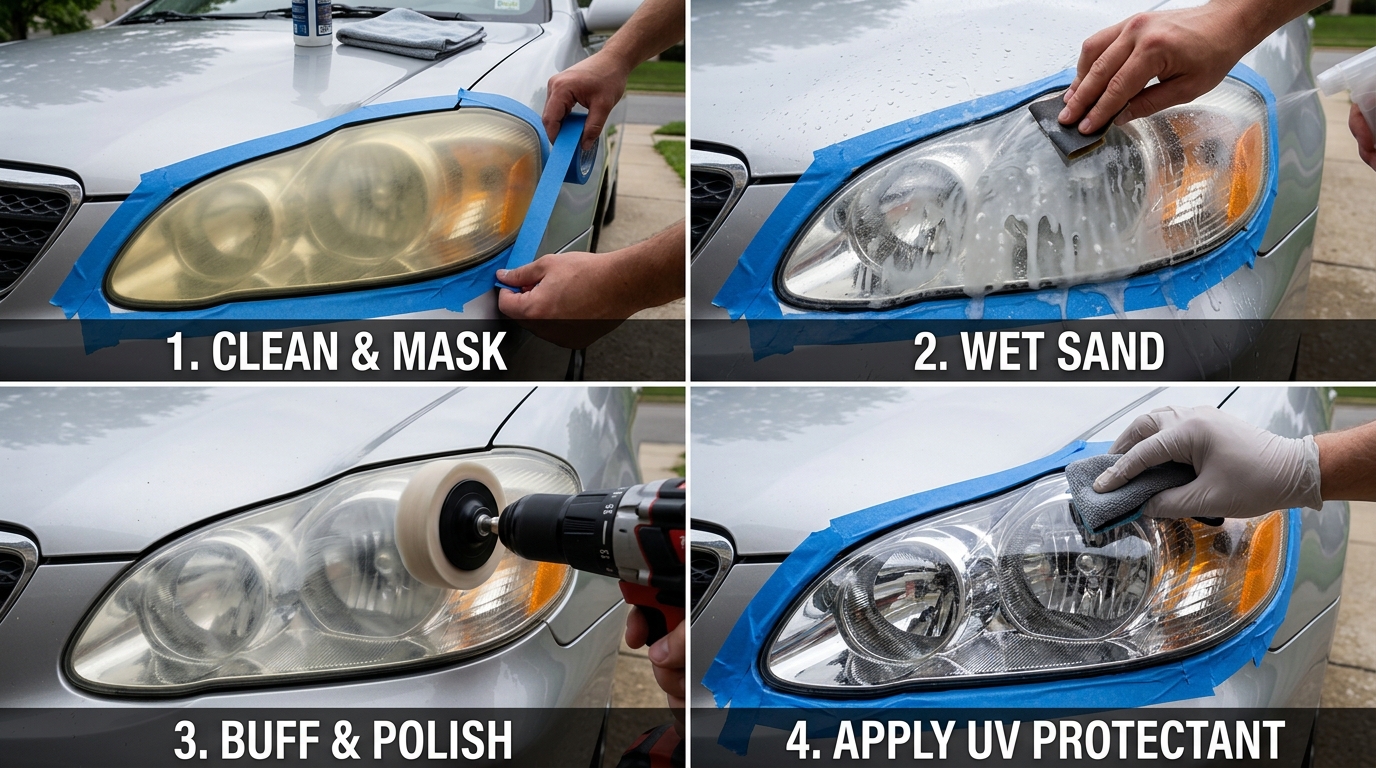
Are your headlights looking yellow and dull, affecting both the appearance and performance of your car? In this guide, we will show you how to easily polish your headlights to remove yellowing and restore clarity. Say goodbye to cloudy headlights and hello to improved visibility and a refreshed look for your vehicle. Let’s dive in and bring back the shine to your car’s headlights!
Causes of Headlight Yellowing
UV Exposure: One of the primary reasons for headlight yellowing is prolonged exposure to ultraviolet (UV) rays from the sun. Over time, these rays can break down the protective coating on the headlights, leading to discoloration and fogging.
Oxidation: Another common cause of headlight yellowing is oxidation, which occurs when the outer layer of the headlights reacts with oxygen in the air. This chemical reaction can lead to a cloudy or yellowish appearance on the surface of the headlights, diminishing their brightness and clarity.
Pollution and Contaminants: Pollutants in the air, such as dirt, dust, and other environmental contaminants, can also contribute to headlight yellowing. These particles can accumulate on the surface of the headlights, creating a film that reduces light output and causes discoloration over time.
Materials Needed
1. Headlight Restoration Kit: Purchase a headlight restoration kit that typically includes sandpaper, polishing compound, and a sealant. These kits are specifically designed to remove oxidation and restore clarity to headlights.
2. Microfiber Cloths: Have a few clean microfiber cloths on hand to apply the polishing compound and buff the headlights to a clear shine. Microfiber cloths are gentle on the headlights and help avoid scratching the surface.
3. Masking Tape: Use masking tape to protect the surrounding areas of the headlights, such as the car’s paint or trim, from accidental scratches during the restoration process.
4. Water and Soap: Before starting the restoration, make sure to clean the headlights with water and a mild soap to remove any dirt or grime on the surface. This ensures a smooth restoration process.
5. Water Spray Bottle: Fill a spray bottle with water to keep the headlights wet during sanding to prevent overheating and ensure a more effective removal of oxidation.
Step-by-Step Guide to Polishing Headlights
Step 1: Preparation
Start by cleaning the headlights thoroughly with a gentle soap and water solution. Dry them completely before moving on to the next step.
Step 2: Masking
Use painter’s tape to mask off the surrounding areas of the headlights to protect your car’s paint from any accidental scratches during the polishing process.
Step 3: Applying the Polish
Apply a small amount of headlight polish onto a clean microfiber cloth. Rub the polish onto the headlight using circular motions, working in small sections at a time.
Step 4: Buffing
Use a separate clean microfiber cloth to buff the polish off the headlight. Continue buffing until the headlight becomes clear and free of any haze or yellowing.
Step 5: Final Touches
Remove the painter’s tape and clean any residue. Inspect the headlights to ensure they are clear and polished evenly. Repeat the process if necessary for optimal results.
Tips for Maintaining Clear Headlights
Regular Cleaning: One of the most important tips for maintaining clear headlights is to clean them regularly. Dirt, grime, and debris can build up on the headlights, reducing their brightness and clarity. Use a mild soap and water solution to clean the headlights and remove any buildup.
Protective Coating: Applying a protective coating to your headlights can help prevent yellowing and fogging. There are various headlight restoration kits available that include a protective UV coating. This coating acts as a barrier against environmental factors that can damage the headlights.
6. Common Mistakes to Avoid
Skipping Proper Cleaning: One common mistake to avoid when maintaining clear headlights is skipping the proper cleaning steps. Before applying any restoration products, it is crucial to thoroughly clean the headlights to remove dirt, grime, and other contaminants. Failing to do so can result in poor adhesion of the restoration products and subpar results.
Overlooking UV Protection: Another mistake is overlooking the importance of UV protection after restoring headlights. UV rays from the sun can quickly degrade the plastic lens, leading to yellowing and hazing. It is essential to apply a protective sealant or coating specifically designed to block UV rays and prolong the clarity of the headlights. Ignoring this step can result in the headlights deteriorating prematurely, undoing all the restoration work.
Conclusion
After following the step-by-step guide to polishing headlights and learning about the tips for maintaining clear headlights, you should now have a good understanding of how to keep your headlights in top condition. By regularly checking and cleaning your headlights, you can ensure optimal visibility while driving, improving safety for yourself and others on the road.
Remember that prevention is key when it comes to headlight yellowing. By taking proactive measures to protect your headlights from environmental factors and UV damage, you can prolong their lifespan and maintain a clear, bright beam of light. With proper care and maintenance, your headlights can continue to serve you well for years to come.