
“Unlock the secrets of your engine’s performance with a compression tester. Discover how this essential tool can provide valuable insights into your vehicle’s health and help you diagnose potential issues before they become major problems. Whether you’re a seasoned mechanic or a DIY enthusiast, learning how to use a compression tester can save you time and money in the long run. Dive into this comprehensive guide to unleash the full potential of your engine and keep your ride running smoothly.”
Types of Compression Testers
Compression testers come in various types, each offering unique features and capabilities. The most common types include:
1. Mechanical Compression Testers: These traditional testers operate using a gauge that measures the compression pressure directly. They are simple to use and cost-effective, making them popular among DIY enthusiasts and mechanics.
2. Digital Compression Testers: These testers provide digital readouts of the compression pressure, offering more accuracy and precision compared to mechanical testers. They often come with additional features such as data storage and analysis capabilities.
3. Leak-Down Testers: Unlike traditional compression testers, leak-down testers assess the percentage of leakage in an engine’s cylinders. They are useful for diagnosing specific issues like valve or piston ring leaks, providing valuable insights into the engine’s overall health.
3. Preparing your Engine for Compression Testing
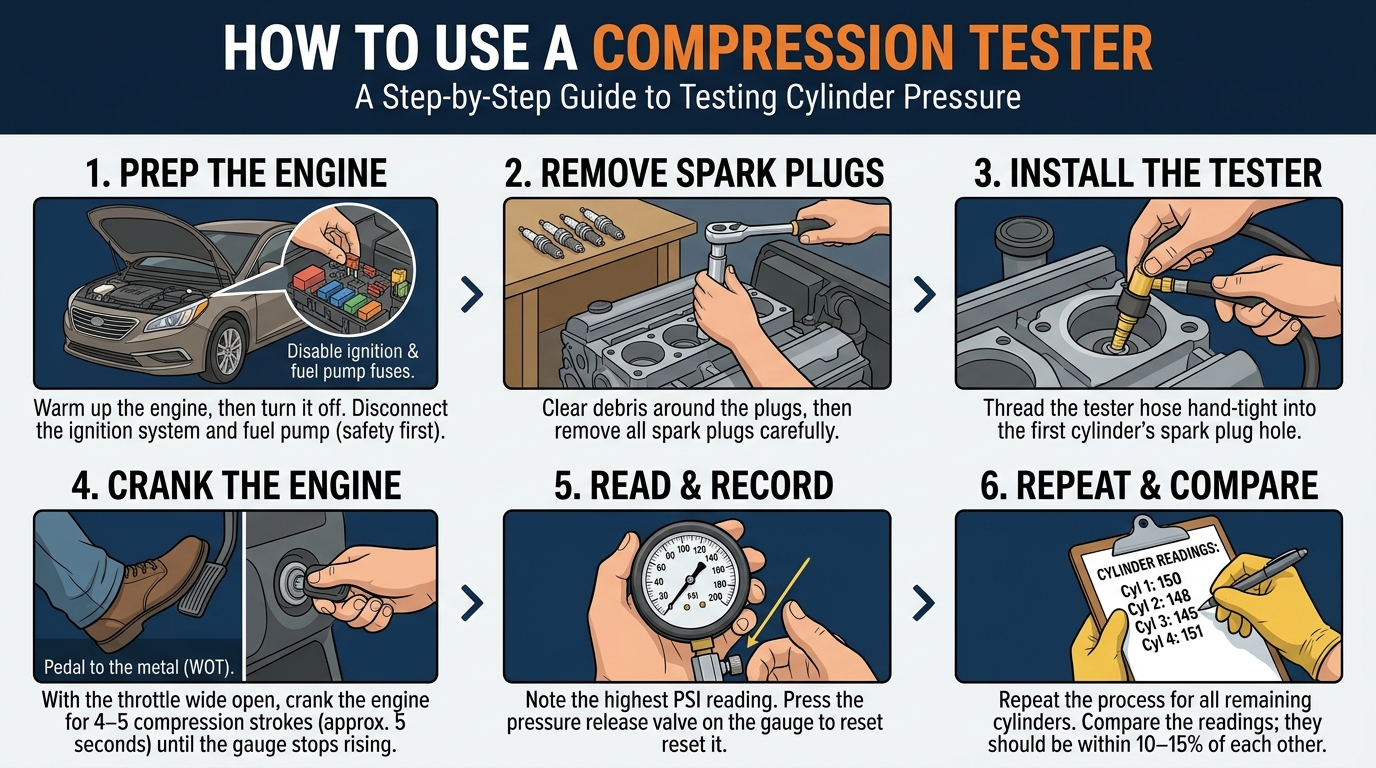
Before conducting a compression test on your engine, it is crucial to properly prepare the engine to ensure accurate results. Start by ensuring that the engine is at operating temperature. This allows for proper expansion of engine components, providing more accurate compression readings. Next, disable the ignition system to prevent the engine from starting during the test. You can achieve this by disconnecting the ignition coil or spark plug wires.
Additionally, it is important to remove all spark plugs from the engine before conducting the test. This step allows the engine to crank freely without compression building up in any specific cylinder. Make sure to label each spark plug wire or coil to ensure they are reinstalled correctly after the test. Lastly, it is recommended to have a fully charged battery to ensure consistent cranking speed throughout the compression test.
Step-By-Step Guide to Using a Compression Tester
Step 1: Start by ensuring your engine is turned off and the vehicle is parked on a level surface. Remove any components necessary to access the spark plugs.
Step 2: Remove all spark plugs from the engine. It’s essential to label each spark plug wire to avoid confusion during reinstallation.
Step 3: Thread the compression tester into the spark plug hole for the first cylinder. Make sure it’s securely in place to prevent air leakage.
Step 4: Have an assistant crank the engine over a few times while you observe the pressure gauge on the compression tester. Note the highest reading displayed.
Step 5: Repeat the process for each cylinder in your engine. Remember to compare the compression readings between cylinders to identify any significant variations.
Step 6: Once you have completed the compression test for all cylinders, reinstall the spark plugs and any components that were removed.
Understanding Compression Test Results
Interpreting the results of a compression test is crucial in diagnosing the health of an engine. The compression values obtained will indicate the overall condition of the engine’s internal components, specifically the piston rings, cylinders, and valves. A compression test typically involves measuring the pressure generated in each cylinder when the piston is at top dead center. The results are usually presented in psi (pounds per square inch) or bar.
Normal vs. abnormal results: Normal compression values for an engine will vary depending on the make and model, but generally fall within a specific range. Lower compression values in one or more cylinders may indicate issues such as worn piston rings, cylinder wall damage, or valve problems. Significant variations between cylinders can also point to potential issues. Understanding these results can help pinpoint the source of engine problems and guide necessary repairs to restore optimal performance.
Common Compression Testing Mistakes to Avoid
When conducting compression testing on an engine, it is crucial to avoid common mistakes that could lead to inaccurate results. One common mistake is not ensuring that the engine is at operating temperature before testing. Cold engines can provide lower compression readings, giving a false impression of engine health. It is recommended to run the engine for a few minutes to warm it up before conducting the test.
Another mistake to avoid is not disabling the ignition system during testing. If the ignition system is not disabled, the engine may start during the test, causing potential safety hazards. It is important to disconnect the ignition coil or fuel injector to prevent the engine from starting. Additionally, not properly sealing the compression tester in the spark plug hole can result in air leakage and inaccurate readings. Ensuring a tight seal is essential for obtaining reliable compression test results.
Maintaining your Compression Tester
Maintaining your compression tester is crucial to ensure accurate and reliable results during testing. Regular maintenance can help prolong the lifespan of your equipment and prevent any potential issues that may affect the accuracy of your readings.
One important aspect of maintenance is to regularly check the condition of the tester’s O-rings and seals. Over time, these components can wear out or become damaged, leading to air leaks that can compromise the test results. Make sure to inspect and replace any worn or damaged O-rings to maintain a proper seal.