
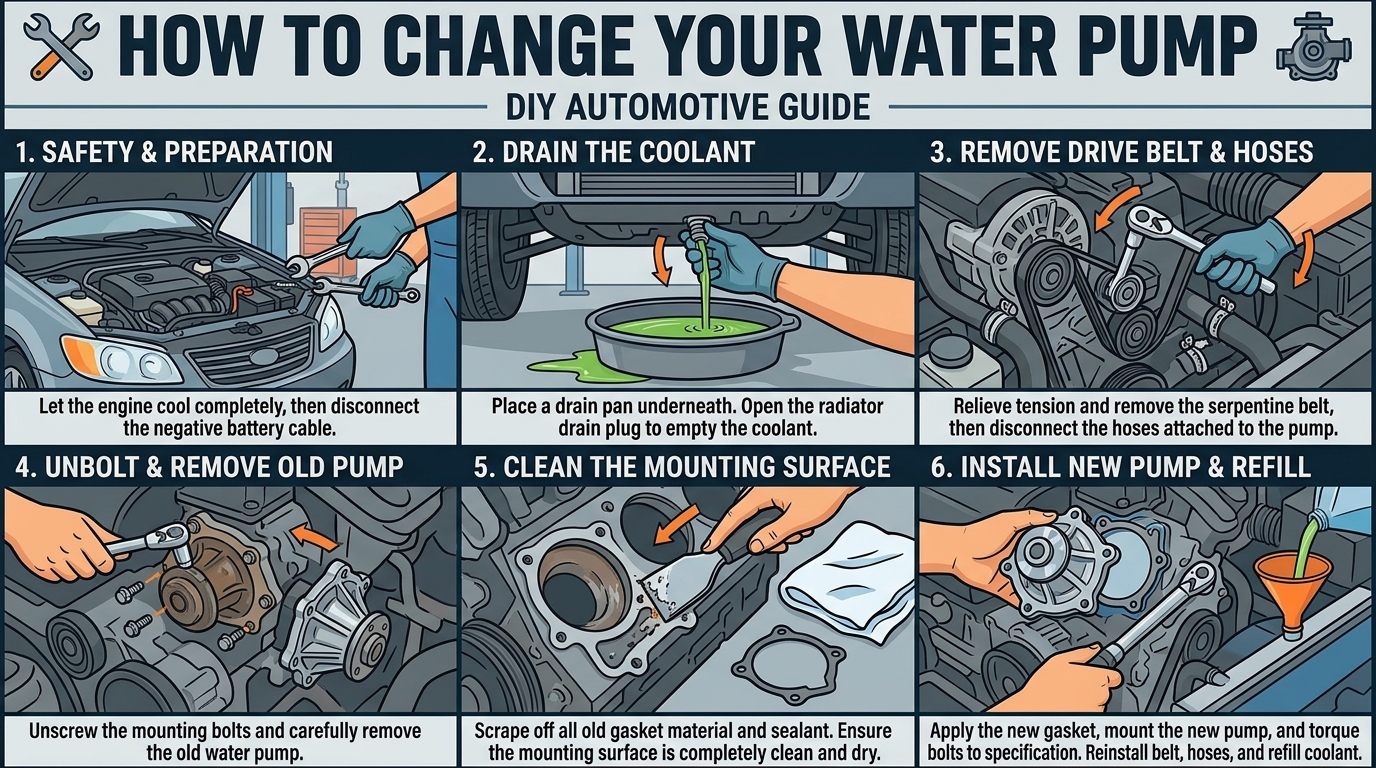
Changing your water pump can be a crucial task for maintaining the health and performance of your vehicle. Whether you’re a seasoned car enthusiast or a novice DIY-er, understanding how to change your water pump can save you time and money in the long run. In this guide, we will walk you through the step-by-step process of changing your water pump, providing you with the knowledge and confidence to tackle this essential maintenance task.
Signs Your Water Pump Needs to Be Replaced
Leaking Coolant: One of the most common signs that your water pump may need to be replaced is the presence of a coolant leak. If you notice puddles of coolant under your vehicle or visible coolant dripping from the water pump itself, it is a clear indication that the pump is failing.
Engine Overheating: A failing water pump can lead to engine overheating as it is unable to circulate coolant effectively. If you notice your engine temperature gauge rising into the red zone or receive warnings of engine overheating, it may be time to inspect and replace the water pump.
Noise Coming from the Water Pump: Unusual noises such as grinding or whining coming from the water pump area can signal that the bearings inside the pump are worn out. This can lead to pump failure and the need for a replacement to prevent further damage to the cooling system.
3. Tools and Materials Needed
Tools: To change your water pump, you will need a set of wrenches, socket set, screwdrivers, pliers, gasket scraper, and a torque wrench. These tools will help you remove the old water pump and install the new one properly. Make sure to have the correct sizes for your specific vehicle model.
Materials: In addition to tools, you will need a new water pump, coolant, gasket sealer, and a new gasket. It is important to use high-quality materials to ensure the longevity and proper function of your new water pump. Make sure to have all the necessary materials on hand before starting the replacement process.
Steps to Change Your Water Pump
Step 1: Drain the cooling system – Begin by allowing the engine to cool down completely. Locate the drain plug at the bottom of the radiator and place a container underneath to catch the coolant. Open the drain plug and let all the coolant drain out.
Step 2: Remove the old water pump – Disconnect the negative battery cable to prevent any accidents. Locate the water pump, typically connected to the engine block, and remove any components obstructing access. Unbolt the water pump and carefully remove it, taking note of any hoses or connections that need to be detached.
Step 3: Install the new water pump – Clean the mounting surface on the engine block thoroughly before placing the new water pump. Apply a thin layer of gasket sealant on the new water pump and carefully position it in place. Secure the pump with the appropriate bolts and make sure it is tightly fastened.
Step 4: Reassemble components – Reattach any hoses, belts, or other components that were removed during the process. Double-check all connections and ensure everything is properly secured. Refill the cooling system with fresh coolant according to the manufacturer’s specifications.
Tips for a Successful Replacement
1. Take Your Time: When replacing your water pump, it’s crucial to take your time and not rush through the process. Rushing could lead to mistakes that could cause issues later on. Make sure to follow each step carefully and double-check your work as you go along.
2. Use the Right Tools: Having the correct tools for the job can make the replacement process much smoother. Make sure you have all the necessary tools on hand before you start. This includes wrenches, sockets, a torque wrench, and any other tools specified in your vehicle’s manual.
3. Refer to Your Vehicle Manual: Your vehicle’s manual is a valuable resource when replacing your water pump. It will provide you with specific instructions for your make and model, including torque specifications and any other important details. Be sure to consult the manual throughout the process to ensure you are following the correct procedures.
6. Testing Your New Water Pump
After installing a new water pump, it is crucial to test it to ensure it is functioning correctly. Start by filling the radiator with coolant and checking for any leaks around the pump. Next, run the engine and monitor the temperature gauge to make sure it stays within the normal range. Listen for any unusual noises that could indicate a problem with the pump.
Another important test is to check the water flow from the pump. You can do this by feeling the hoses connected to the pump to ensure they are hot, indicating that hot coolant is circulating properly. Additionally, you can use a thermometer to measure the temperature of the coolant as it exits the pump to confirm that it is at the correct operating temperature. By performing these tests, you can be confident that your new water pump is working effectively and maintaining the proper cooling system function.
Conclusion
Replacing your water pump is a crucial maintenance task that can help ensure the proper functioning of your vehicle’s cooling system. By following the steps outlined in this guide, you can successfully replace your water pump and prevent potential overheating issues.
Remember to always use the appropriate tools and materials, and take your time to carefully follow each step to avoid any mistakes. Testing your new water pump after installation is also essential to confirm that everything is working correctly. With proper maintenance and timely replacements, you can keep your vehicle running smoothly and avoid costly repairs in the future.