
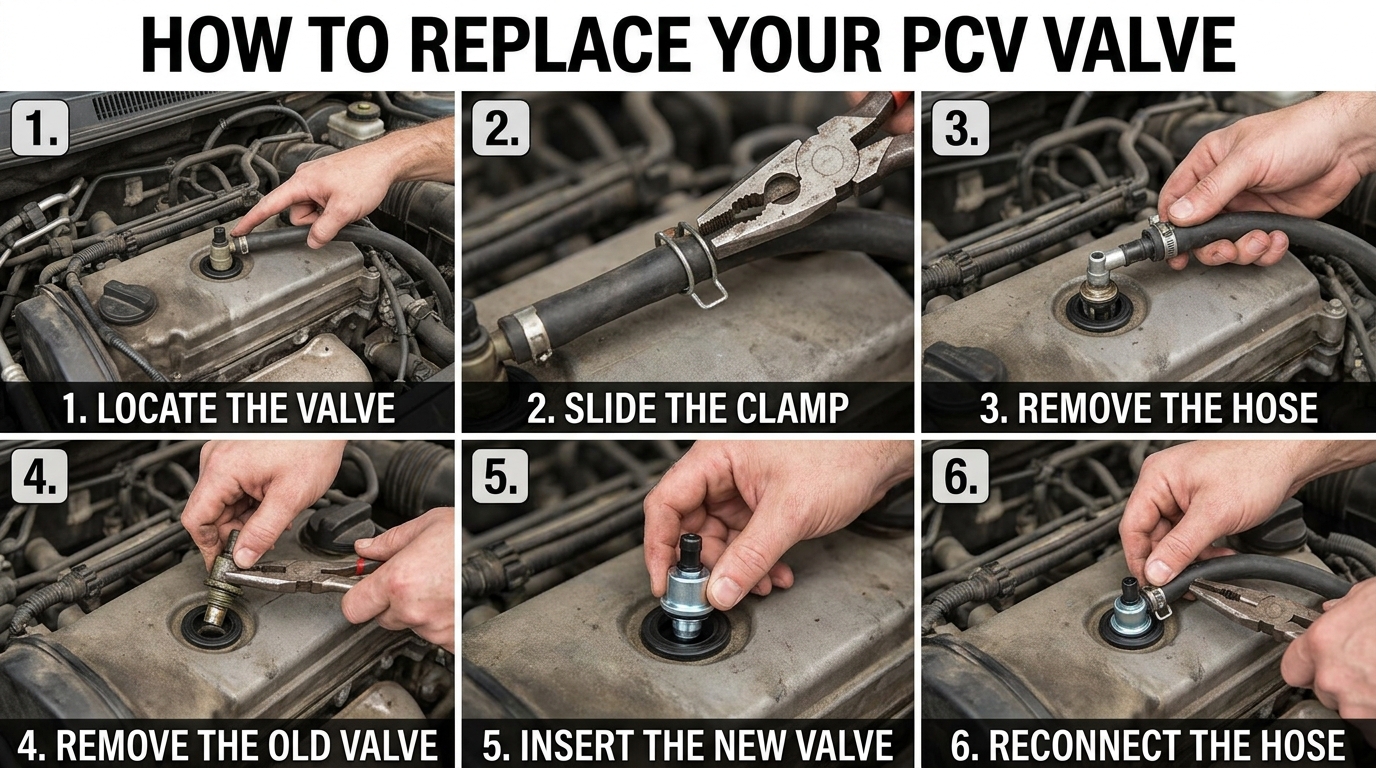
Replacing your PCV valve may seem like a daunting task, but with the right guidance and tools, it can be a straightforward process that can improve the performance and efficiency of your vehicle. In this guide, we will walk you through the steps to replace your PCV valve, ensuring that your engine is running smoothly and efficiently. Let’s dive in and learn how to keep your car in top condition!
Symptoms of a Bad PCV Valve
A bad PCV valve can lead to various issues in your vehicle that may affect its performance and efficiency. Here are some common symptoms to look out for:
1. Increased Oil Consumption: One of the primary signs of a faulty PCV valve is increased oil consumption. If you notice that your vehicle is burning more oil than usual, it could be due to a malfunctioning PCV valve.
2. Poor Engine Performance: A bad PCV valve can cause a rough idle, stalling, or hesitation during acceleration. This can impact the overall performance of your vehicle and may lead to drivability issues.
3. Check Engine Light: If the PCV valve is not functioning correctly, it can trigger the check engine light on your dashboard. This warning sign should not be ignored and needs to be addressed promptly to avoid further damage to the engine.
4. Increased Emissions: A malfunctioning PCV valve can lead to increased emissions, which can cause your vehicle to fail emissions tests. This can result in fines or the inability to legally drive your vehicle on the road.
Tools Needed
Replacing a PCV valve may require the following tools:
- Flathead screwdriver: Used for removing any clips or screws holding the PCV valve in place.
- Pliers: Helpful for gripping and pulling out the old PCV valve.
- Ratchet and socket set: To loosen and tighten any bolts or nuts securing the valve.
- New PCV valve: Ensure you have the correct replacement part for your vehicle make and model.
- Rag or paper towels: Useful for cleaning any dirt or oil around the valve area.
- Protective gloves: Recommended to keep your hands clean and protected from any chemicals.
Having these tools ready beforehand can help streamline the process of replacing the PCV valve and ensure a successful installation.
Step-by-Step Guide to Replace PCV Valve
1. Locate the PCV Valve
Locate the PCV valve in your vehicle’s engine bay. It is typically a small, cylindrical component connected to the engine block or the intake manifold by a hose.
2. Remove the Old PCV Valve
Before removing the old PCV valve, make sure the engine is cool to avoid burns. Using the appropriate tools, such as pliers or a wrench, loosen the clamp securing the hose to the valve. Once the clamp is loose, gently pull the hose off the old PCV valve.
3. Install the New PCV Valve
Take the new PCV valve and insert it into the hose. Ensure it is securely in place. Then, reconnect the hose to the engine by sliding it onto the new PCV valve and tightening the clamp to secure it in place.
4. Test the Replacement
After installing the new PCV valve, start the engine and check for any leaks or unusual noises. Rev the engine a few times to ensure proper airflow through the valve. If everything looks and sounds normal, you have successfully replaced the PCV valve in your vehicle.
Tips and Tricks
Regular Maintenance: It is essential to perform regular maintenance on your PCV valve to ensure optimal engine performance. Check the valve at least once a year and replace it if necessary. Keeping the valve clean and functional can prevent issues such as oil leaks and poor engine efficiency.
Use OEM Parts: When replacing the PCV valve, it is recommended to use original equipment manufacturer (OEM) parts. OEM parts are designed specifically for your vehicle’s make and model, ensuring a proper fit and reliable performance. Avoid using aftermarket parts that may not meet the same quality standards.
Consult a Professional: If you are unsure about how to replace the PCV valve or encounter any difficulties during the process, don’t hesitate to consult a professional mechanic. They have the expertise and tools to efficiently replace the valve and address any underlying issues that may be affecting your vehicle’s performance.
Common Mistakes to Avoid
1. Ignoring Regular PCV Valve Maintenance: One common mistake to avoid is neglecting regular maintenance of the PCV valve. Over time, the PCV valve can become clogged or malfunction, leading to potential issues with the engine’s performance. It is important to follow the manufacturer’s recommendations for PCV valve inspection and replacement to ensure optimal functioning of your vehicle.
2. Using the Wrong PCV Valve: Another mistake to avoid is using the wrong type of PCV valve for your vehicle. Using an incorrect PCV valve can lead to improper ventilation in the crankcase, causing a build-up of pressure and potentially damaging engine components. Always refer to the vehicle’s manual or consult with a professional to ensure you are using the right PCV valve for your specific make and model.
Conclusion
Replacing the PCV valve is a straightforward maintenance task that can greatly benefit your vehicle’s performance and longevity. By following the step-by-step guide provided in this document, you can ensure that your PCV valve is functioning properly, preventing potential issues such as poor engine performance, decreased fuel efficiency, and increased emissions.
Remember to regularly inspect and replace your PCV valve as part of your routine vehicle maintenance to keep your engine running smoothly. By staying proactive and addressing any PCV valve issues promptly, you can save yourself from more significant and costly repairs down the line. With the right tools and knowledge, you can easily tackle this task and enjoy the benefits of a well-maintained PCV system in your vehicle.