
Are you experiencing decreased fuel efficiency or a rough idle in your vehicle? One common culprit could be a faulty oxygen sensor. Learning how to replace an oxygen sensor yourself can save you time and money, and ensure your vehicle is running smoothly. In this guide, we will walk you through the steps to effectively replace an oxygen sensor in your car. Let’s get started!
Signs of a Faulty Oxygen Sensor
Oxygen sensors play a crucial role in monitoring the oxygen levels in a vehicle’s exhaust gases, helping to maintain optimal fuel efficiency and reduce harmful emissions. Recognizing the signs of a faulty oxygen sensor is essential for ensuring the proper functioning of your vehicle.
One common sign of a faulty oxygen sensor is a decrease in fuel efficiency, as the sensor may provide incorrect readings to the engine control unit, leading to an improper air-fuel mixture. Additionally, a malfunctioning oxygen sensor can cause the vehicle to run rough, misfire, or have difficulty starting. Another indicator of a faulty sensor is an increase in emissions, potentially causing the vehicle to fail an emissions test. Lastly, a check engine light illuminated on the dashboard could also point towards a faulty oxygen sensor that needs replacement.
3. Tools and Materials Needed
Replacing an oxygen sensor requires a few essential tools and materials to ensure a successful installation. The most important tool you’ll need is a sensor socket or wrench specifically designed for oxygen sensors. This tool is crucial for reaching and removing the sensor from its location in the exhaust system.
Additionally, you may need penetrating oil to help loosen any rusted or seized sensor threads. It’s also a good idea to have a wire brush on hand to clean the area around the sensor before installing the new one. Finally, make sure to have anti-seize compound to apply to the threads of the new sensor to prevent seizing in the future.

4. Steps to Replace an Oxygen Sensor
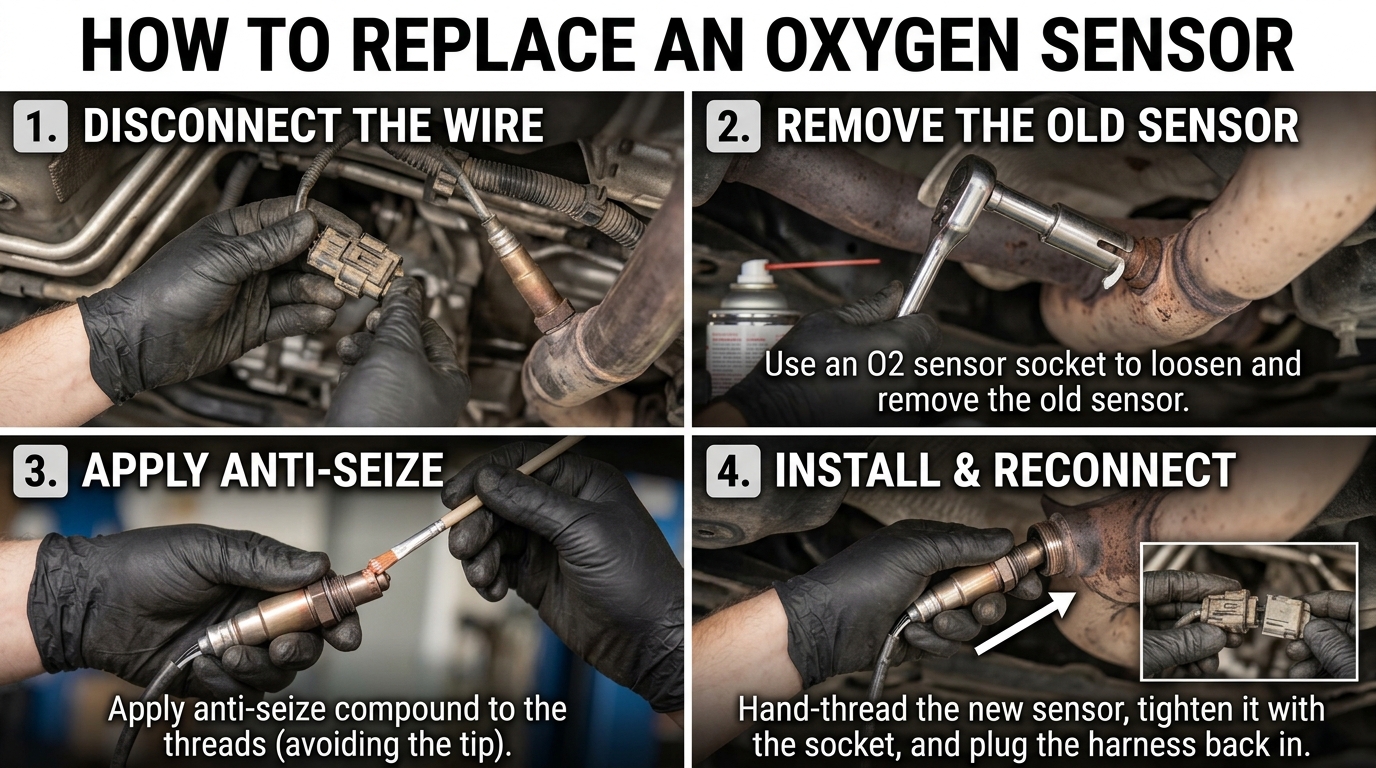
Step 1: Locate the oxygen sensor – The oxygen sensor is typically located in the exhaust system near the catalytic converter. You may need to raise the vehicle and safely secure it on jack stands to access the sensor.
Step 2: Disconnect the electrical connector – Once you have located the oxygen sensor, disconnect the electrical connector that is attached to it. Be careful not to damage the wires during this process.
Step 3: Remove the old sensor – Use an appropriate wrench or socket to carefully loosen and remove the old oxygen sensor from the exhaust system. It may be necessary to use penetrating oil to help loosen a stubborn sensor.
Step 4: Install the new sensor – Carefully thread the new oxygen sensor into the exhaust system by hand to avoid cross-threading. Use a torque wrench to tighten the sensor to the manufacturer’s specifications.
Step 5: Reconnect the electrical connector – Once the new sensor is securely in place, reconnect the electrical connector to ensure proper functionality. Double-check all connections before lowering the vehicle back to the ground.
Tips for a Successful Replacement
1. Safety First: Before starting the replacement process, ensure the engine is cool to avoid burns. Use gloves and safety goggles to protect yourself from any harmful chemicals or sharp edges under the vehicle.
2. Proper Tools: Make sure you have all the necessary tools handy, such as a wrench, socket set, penetrating oil, and a jack stand. Using the right tools will make the replacement process smoother and more efficient.
3. Disconnect Battery: To prevent any electrical mishaps, disconnect the negative terminal of the battery before starting the replacement. This will ensure your safety and protect the electrical system of your vehicle.
4. Follow Instructions: Refer to the vehicle’s manual or online guides for specific instructions on how to replace the oxygen sensor in your car model. Following the correct steps will help you avoid mistakes and ensure a successful replacement.
5. Test Drive: After replacing the oxygen sensor, take your car for a test drive to ensure everything is working correctly. Monitor the performance of the vehicle and check for any warning lights on the dashboard to confirm the successful replacement.
6. Testing the New Oxygen Sensor
Testing the new oxygen sensor is crucial to ensure that it is functioning properly and accurately detecting the oxygen levels in the exhaust system. One common method to test the oxygen sensor is using a multimeter. Begin by setting the multimeter to the voltage setting. Then, connect the multimeter to the signal wire of the oxygen sensor. Start the engine and let it run for a few minutes to warm up. The oxygen sensor should fluctuate between 0.1 to 0.9 volts if it is working correctly. If the voltage remains steady or does not change, the oxygen sensor may be faulty and need to be replaced.
Another method to test the new oxygen sensor is using a scan tool. Connect the scan tool to the vehicle’s onboard diagnostics port and access the live data for the oxygen sensor. Monitor the sensor readings while the engine is running to ensure that it is providing accurate data to the engine control unit. If the sensor readings are erratic or out of range, it may indicate a faulty oxygen sensor that requires further inspection or replacement.
Conclusion
Replacing a faulty oxygen sensor is a critical maintenance task that can greatly improve the performance and fuel efficiency of your vehicle. By following the steps outlined in this guide, you can successfully replace the sensor yourself and avoid costly trips to the mechanic. Remember to always use the correct tools and materials, and take your time to ensure everything is installed properly.
After replacing the oxygen sensor, it’s a good idea to test the new sensor to make sure it is functioning correctly. Use an OBD scanner to check for any error codes and ensure that the sensor is providing accurate readings to the engine control unit. With a new oxygen sensor in place, you can enjoy a smoother running engine and better fuel economy.